The Nikkor 85mm f/2.0 is known as a sharp and fast portrait tele lens. It was built from 1977-1995, first as AI and later as AI-S version. Here, I am repairing the AI-S version. The glass and aperture are still in excellent shape, but the focus feels awful. This is most likely due to dried and dirty grease in the focusing helicoid.
Tools
This is what is needed for the job.
- JIS (Japanese Industrial Standard) screwdrivers since the screws in these Japanese lenses are not Phillips screws, but JIS screw heads which are slightly different. Using a Phillips screwdriver can easily ruin the heads. So do yourself a favor a buy a set of Vessel screwdrivers. I got a set for $13 and the quality is much better than any other (cheap) screwdriver set I ever used.
- High percentage Iospropyl Alcohol (I got 91%) and cotton swabs (for cleaning all surfaces and the old grease in the helicoids)
- Zippo Lighter Fluid
- Helicoid grease
Warning
The disassembly of manual focus Nikkor lenses is conceptually extremely easy. The only problem that one encounters are screws that are glued and/or cemented and therefore very hard to unscrew. One has to be very careful not to strip the heads of the screws.
While working on this lens, I encountered this problem three times. In two cases, I was able to solve the problem by soaking the screws in alcohol and adding heat (with the tip of a soldering iron). In the third case, I failed and I ruined the screw. But, as described below, I was able to do a work-around and finish repairing the lens.
While working on this lens, I encountered this problem three times. In two cases, I was able to solve the problem by soaking the screws in alcohol and adding heat (with the tip of a soldering iron). In the third case, I failed and I ruined the screw. But, as described below, I was able to do a work-around and finish repairing the lens.
Disassembly
Since the glass and aperture are in great shape, I do not have to do any work on the front side - just enter the lens from the rear side.
I start by removing the three bayonet screws (one was very hard to get loose - only after soaking the head in alcohol and applying heat it came out).
I remove the back plate, and notice the connections.
The aperture ring can be removed.
I remember how the spring for the aperture clicks is positioned before I unscrew the two screws.
For the following, it is important to set the lens to a well-defined focus distance - I set it to infinity focus.
I unscrew both helicoid keys (remember not to change the focusing!).
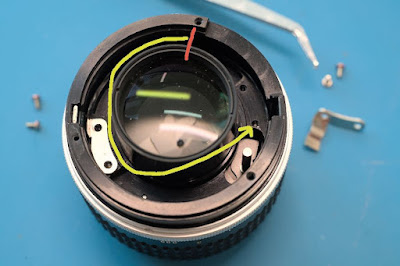
The red arrows indicate the alignment before taking out the inner piece. Now, I carefully rotate the inner piece (with the optical system) clockwise (when seen from the back) and note when the inner helicoid becomes free. In my case, this happens when the screw hole on the right (marked by the red arrow) makes about 3/4 turn (as indicated by the yellow arrow).
When the helicoid comes out, you see immediately the reason for the poor focusing: Old dried and dirty grease. This needs to be cleaned on both sides.
Clean!
To access the second (fine) helicoid (which holds the focus ring), I try to unscrew the three screws in the silver ring. This worked well for two of them ...
... but it failed for the third one. I totally ruined that screw head. So, either I get a screw removal tool, or I try a work-around.
As work-around, I try to clean this helicoid in place as follows: I rotate the focus ring to minimum distance which opens up the slit (indicated by the yellow arrow) by a small amount. Then I insert some Zippo lighter fluid and turn the while thing, so that the lighter fluid gets everywhere. I do this a few times, let it sit overnight and repeat it again the next day. After the second or third time the focus ring is rotating without noticeable friction. Then I carefully insert a little grease into the slit. After turning the focus ring many times forth and back, it feels like the grease is somehow distributed in there.
Now, I add small amounts of grease (less than a droplet) at three places in the inner part with a toothpick.
I insert the inner piece exactly where it came out, and check if it is able to rotate to its final position (as indicated in the picture). Actually, I did this step a few times before I added the grease, just to be sure that I remembered everything correctly.
Now, I just undo all the steps above, first inserting both helicoid keys (with tiny amounts of grease, where they touch the moving piece), ...
... the spring for the aperture clicks...
... the aperture ring ....
... and the back plate, making sure that it connects correctly (the yellow and red connections).
Fixing the bayonet plate ...
... and the lens is ready to be used again!
The focus is super smooth - just like it probably was when it came from the factory, many years ago.
More of my lens repair tutorials can be found here.


No comments:
Post a Comment