previous posts in this series:
- Building the Dewey Drone from "Silent Running" (1972) - Part I: Getting Started
- Building the Dewey Drone from "Silent Running" (1972) - Part II: Main Body and Sides
- Building the Dewey Drone from "Silent Running" (1972) - Part IV: Legs and Feet and Toes
- Building the Dewey Drone from "Silent Running" (1972) - Part V: Painting and Assembly

In part II, I assembled the center piece of the body, the front frame and both sides. In the next steps, I am adding all those nifty little details.
Details for the Sides
Side Boxes
Now, I take the pieces that cover the openings in the bottom of the sides, stick them into the slots of the sides and glue them together (note: I do not yet glue them onto the sides! I will do that later when they are sanded and painted).
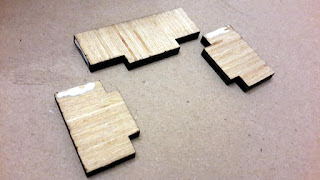


And after sanding they look like this.

From the inside of these boxes the black hoses emerge which are connected to the legs. The following pieces will be glued inside the body, to the backside of the holes for the boxes. The three holes will hold screws to which the hoses will be attached.


Vents
The two vents on the top of the right side are made from two plates, one with the holes and one as a spacer.


The Handles
The handles on the left and right sides are made of these pieces.

The solid plate on the left will later be glued to the inside of the body (after painting). The other pieces are sanded (to obtain round edges) and are glued to the sides.

Triangular Pieces
Dewey's side pieces do not fit the center piece at 90 degree angle. Instead, there is a narrow band under a small angle (approx 20 degrees). I did not know how to include this in the laser cutter files, so I decided that this piece would have to be made by hand. It's a triangular piece where one side is 1/2", the other side 1 1/8" which I made using a table saw.


Top Left Detail
I don't know how to call this piece which sits on the top of the left side. It's made of two pieces with rounded corners, mounted with a little space in between.

Switch Plate (left side)
This plate will later hold three switches, potentiometers, and/or rotary encoders (I have not yet spent any thoughts about any possible electronics that I may add to Dewey). Since it will be black (and not in the blue color of the body), it will be glued in later, after painting.
Details for the Front Side
Speaker Grille
The "speaker grille" on the top left of the front is made of the pieces from file (10).

To get the "speaker grille" to the correct height, I add six 1-inch spacers into the body.

Bottom Left Structure
The structure of the bottom of the left of the front is made from some of the pieces in file (1).


These will later be glued into the body (with spacers) after everything is painted.
The Lamp on the Top Right
I am not sure if I will find some reflector that will fit the opening for the lamp on the top right, so I started make the lamp from scratch. The pieces are included on file (1). From the left, these are two spacers, one piece on which the acrylic pieces sit, one piece that surrounds the acrylic pieces, one one piece on top of the acrylic pieces. The two (thin) acrylic pieces are seen below. One of them has vertical lines engraved with a spacing of 1/32".

The "Wire Box"
The piece below the lamp is holding blue and yellow wires, and a few little light bulbs. It is made of three spacers, one piece that has the holes for the wires, plus two pieces on top which frame the wires.


Details for the Top Plate
The top plate features three details, an orange ring (in the middle), a grey object on the left, and two yellow and green memory card holders on the right. The grey object is made from two thin pieces of solid wood, and the orange ring with the laser cutter. In the movie one cannot see what's inside the ring. But somewhere, I saw a build that had a grid structure inside. This makes it more interesting, so I added that too.


The memory card holders are made of three layers of 3/16" plywood, holding a thin acrylic plate inside.


A Programmer for the Memory Cards
For designing the memory cards, I made the following collection of all movie scenes in which they were featured.


In the next step, I'm building Dewey's legs, feet, and toes...


