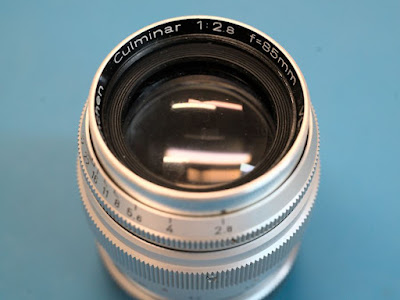
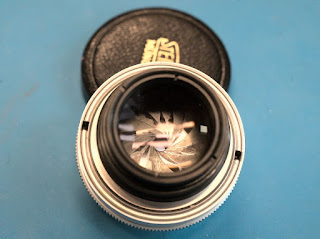
This Steinheil-München Culminar 85mm f/2.8 lens was made in Germany in 1953 for the Exakta camera mount. The optical construction consists of 4 elements in 3 groups and the manual aperture has 16 blades, resulting in a beautiful bokeh with round out-of-focus light circles. Optically, it's center performance is very close to the superb Meyer-Optik Orestor 100mm f/2.8, and it's only a little weaker towards the corners.
Pictures
These are two photos that I took with the Culminar 2.8/85mm which nicely display its beautiful rendering.
Lens Hood
The Culminar 2.8/85mm does not have a real filter thread, but inside the ring with the name, there is some "left-over" thread from the ring that holds the front element. It was pointed out at "allphotolenses" that this thread is E36.5x0.5mm and that it fits an adapter that was made for the Nikon Coolpix 885 camera (from E36.5x0.5mm to E52), so one can use this to mount a E52 hood (which clearly improves the performance of this single-coated lens).
Using the Lens Head with Bellows
As mentioned
on this Steinheil page, one can separate the lens head (which has the optical system and the aperture) from the focusing helicoid.
This lens head can then easily be used with bellows.
The thread seem to be something like 36-37mm x 0.5mm (approx.). I still need to figure out the exact values. But I know that adapters exist for both M36.5x0.5mm and for M37x0.5mm to M42. Once I figure this out, I will update this page.
Cleaning the Lens
I got this lens from eBay, in rather good shape! There was plenty of oil on the aperture blades, but it did not noticeably affect the performance, and the focus was pretty smooth and not too hard. But it seemed to be a simple task to clean both, the aperture and the focusing helicoid, so I went ahead and cleaned the lens. I do not mention this below, but in every step, as I disassemble the pieces, I clean them from all sides.
Starting on the backside of the lens head (where you see the oily aperture blades),
I removed the outer ring with a lens spanner,
and took out the lens element.
This gives access to the back side of the aperture.
I cleaned this in place (without further disassembly), by repeatedly cleaning the surface with cotton swabs and lighter fluid (moving counter-clockwise!).
Then I set the focus to infinity, loosened the three screws on the focus ring,
and took it off.
Now I rotate the inner piece of the focusing helicoid slowly (counterclockwise, as seen from the front),
and I capture the exact moment when it comes loose. In my case, it was after almost two turns, when the screw was at the right "8" from the depth-of-field scale.
There's plenty of old grease here!
I clean both pieces with cotton swabs and 91% isopropyl alcohol (IPA).
Then I add a small amount of helicoid lube to the inside of the outer piece. The exact amount of lube depends on the brand that you use - if you use too much, it gets too sticky, and the focus will be too hard.
I insert the inner helicoid exactly where it came loose, and after almost two turns, it stops exactly where it started, at infinity.
I add the focus ring,
screw the rear glass back into the head piece,
and screw the head piece back into the rear piece with the focusing helicoid.
And that's it! Except for some minor wear, the lens looks and feels like new. The aperture blades are pretty clean and the focus is super smooth. This makes manual focusing more precise and more fun.
More of my lens repair tutorials can be found here.


.jpg)


