
This piece came with a Petri camera - its aperture did not move and the focusing was very hard. So, I decided to take it apart for cleaning.
The following description assumes that you have at least a little experience working on lenses. Asides from the aperture assembly, this lens is relatively easy to work on. But for every piece that you remove, check how it was connected (take pictures!) and try to understand how the connections work.


Then the back piece can be removed.


With the the screw removed you can take off the ring for the A/M switch - and a thin brass ring.


To make the re-assembly easier, I would strongly recommend first, to see how far beyond the infinity point it can be inserted. Note: Inserting is counterclockwise!! For my lens, it could be inserted almost half a turn before it reached the stop. Then rotate it back to the infinity position. From there, count the number of turns it takes to unscrew it (clockwise!), and note where it exits.


This worked! But the next time, I would really try to clean the aperture blades in place, without disassembly.


I am currently waiting for the Petri to Sony E mount adapter to arrive. I will update this page when I have first pictures with the lens.
The following description assumes that you have at least a little experience working on lenses. Asides from the aperture assembly, this lens is relatively easy to work on. But for every piece that you remove, check how it was connected (take pictures!) and try to understand how the connections work.

The front ring can simply be unscrewed.

The front optics can be unscrewed either by hand, with a rubber tool, or a lens spanner wrench.

Think twice about whether you really want to extract the aperture blades. For me, it was a pain to get them back in place. If you decide to do so, remove the flat ring with a lens spanner.

On the back side, there are three screws that hold the mount.

Two are easy to remove.

For the third "screw" you may need a special tool - but for me, pliers did the job.

Remember that the special screw is at the top, where you have the red-painted slit in the mount.


Remove this screw to get access to the A/M switch - and store it safely - later you will find a similar (but slightly different) screw - make sure to separate them.


To remove the aperture ring, you have to (1) take out this screw (this operates the internal aperture mechanism) ...

and (2) also these two screws (which set the limits for the aperture ring).

There are three tiny metal balls which may fall out when removing the A/M switch and the aperture rings.
Now, back to the front side - there are three screws holding the focus ring. I would recommend to set the focus ring to infinity before removing it.


Now, make sure not to change the focus.

This screw is the helicoid key. To access the helicoid, take it out. (and continue not to change the focus!)

With the focus ring held in place, slowly rotate the inner helicoid (the brass piece) counterclockwise and make sure to count the number of rotations and note at which position it exits. It has many entry points and you need to make sure to use the right one when reassembling the lens. At the very bottom of this picture, you see a slot in the helicoid. This is where the helicoid key-screw sits (see later in the reassembly).

Before removing the second, fine helicoid (=the focus ring), make a note (a scratch) to remember where the infinity position is.

Now, that everything is disassembled, you can clean all the pieces (I use 91% IPA and/or lighter fluid). Of course, you have to be extremely careful when cleaning the aperture blades.
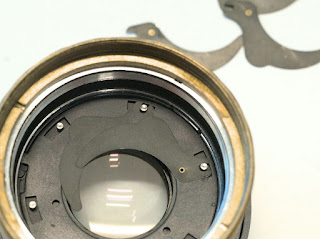
The reassembly starts with the aperture.


The first four blades are easy to insert...

... and the fifth one was a little harder. But the last was a big pain! It took me some time - and many attempts. At the end, my solution was (after the first four blades are in place) to insert and position the 5th and the 6th blades together, before fixing them at the silver pins.


It felt so good when the aperture cover plate was inserted!
Make sure to clean the helicoids very well. And don't use too much grease. With my grease, only tiny amounts are necessary to achieve a great result.
Make sure to clean the helicoids very well. And don't use too much grease. With my grease, only tiny amounts are necessary to achieve a great result.
In this picture, the fine helicoid is already lubed and inserted - and rotated to the infinity position

When the coarse (brass) helicoid is inserted, the screw for the helicoid key is put back such that it enters the slot in the brass piece that was mentioned above (this screw ensures that the helicoid will not rotate, but only move forth and back when turning the focus ring).
The aperture ring is put back - and the two limiting screws are inserted. Not shown: there was a screw in the aperture ring that you removed earlier - put this back.

The thin brass ring and the A/M switch ring are put back, and the screw.

The rear piece and the mount plate are re-assembled.

And the rear side is ready!

On the front side you can insert the optics and the front ring.

And the lens is ready!
It feels really good: The aperture is very responsive and the focus is very smooth.
I am currently waiting for the Petri to Sony E mount adapter to arrive. I will update this page when I have first pictures with the lens.
No comments:
Post a Comment